Permissions
Use sessions and delegate classes to define permissions at the record and field level.
Dataface 0.5.3 has limited support for permissions in your application, however it does enable you to implement your own login/authentication quite easily in addition to the abilitly to limit access to certain records based on who is logged in. Currently all permissions and authentication has to be handled in PHP (i.e., you will need to write some PHP code to get permissions and authentication working). Dataface 0.6 will introduce a more fine-grained permissions model that is backwards compatible with the current permissions model, as well as a more automated way to handle authentication and sessions (without having to write PHP code).
Learning by example
Now consider the familiar example of the Faculty of Widgetry site. Suppose we add the following requirements:
- Users have to log into the system to access it.
- There are two types of users:
- Regular Users - have read-only access to the system
- Administrators - have full access to the system
- Each Course has an Intructor, who has read and write access to that course.
Now that we have defined our requirements, let’s look at how to implement this using PHP and Dataface. We will be performing the following modifications to our system:
- Add a “Users” table to store the user names, passwords, and user levels of the system users.
- Add an “Instructor” field to the “Course” table to store the user name of the user who will be an instructor for the course.
- Add login/logout functionality to our application’s index.php file.
- Define permissions for each table in our application using delegate classes.
Adding the Users table:
The Users table doesn’t need to store very much. Only the user names, passwords, and user levels of each user. The user level is an integer that corresponds to the access level of the user. In our system we will assign the value 0 to mean “no access”, 1 to mean “regular user”, and 2 to mean “administrator”. This is just one way to implement permissions. There are many ways that you can do it.
So our Users table will look something like this:
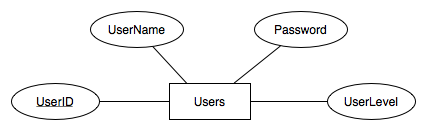
Figure 1: ERD (Entity Relationship Diagram) for Users Table
The SQL to create this table would be as follows:
CREATE TABLE  `Users` (
 `UserID` INT( 11 ) NOT NULL AUTO_INCREMENT ,
 `UserName` VARCHAR( 32 ) NOT NULL ,
 `Password` VARCHAR( 32 ) NOT NULL ,
 `UserLevel` INT( 5 ) DEFAULT  '1' NOT NULL ,
  PRIMARY KEY (  `UserID` ) ,
  UNIQUE (`UserName`)
)
The reason we have a UserID field in addition to a UserName field is so that we can change the UserName without destroying relationships.
Adding the Instructor field to the Course table
Now that we have added our Users table, we can use it in the Courses table to assign a user to be the instructor of a course. First thing we’ll do is create a valuelist of all of the users in the system to be used on the Instructor field (yet to be created). To do this we will do the following:
-
Add the following to the valuelists.ini file in the Course table’s configuration directory (i.e., tables/Course/valuelists.ini):
[Users]
__sql__ = "SELECT UserID, UserName FROM Users ORDER BY UserName"
Next we will actually add the Instructor field to the Course table. The SQL to add this field is as follows:
ALTER TABLE `Course` ADD `Instructor` INT( 11 )
Finally we will set this field to use a select list widget with the Users valuelist that we created above, by adding the following to the fields.ini file for the Course table (i.e., tables/Course/fields.ini):
[Instructor]
widget:type = select
vocabulary = Users
After adding a couple of user records in the Users table, we can now take a look at our new and improved “Course” edit form with the “Instructor” field at the bottom:
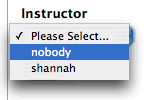
Notice that I created 2 users in my sample application. “nobody”, and a user for myself (shannah).
Adding Login/Logout functionality to your application’s index page:
Now that we have a “Users” table in place, we can implement some login/logout functionality. The bad news is that in version 0.5.3 you have to do this on your own. The good news is that it’s pretty easy to do. All you need to do is wrap the call to $app->display() in your application’s index.php file in logic so that it will only display if the user is logged in - and otherwise, display a login page.
The index.php file for the Faculty of Widgetry application currently looks like this:
<?
require_once '/path/to/dataface/dataface-public-api.php';
df_init(__FILE__, '/url/to/dataface');

$app =& Dataface_Application::getInstance();

$app->display();
?>
All we need to do is change it to something like the following:
<?
require_once '/path/to/dataface/dataface-public-api.php';
df_init(__FILE__, '/url/to/dataface');

$app =& Dataface_Application::getInstance();

authenticate();  // perform authentication (to be defined later)
if ( isLoggedIn() ){
    // The user is logged in, so it is OK to display the application.
    $app->display();
} else {
    // The user is not logged in, so we just show him the login form.
    showLoginForm();
}
?>
OK, some explanations are in order. I have introduced three new functions that have yet to be written. This code snippet just gives you an idea of the control flow. The functions that I have added are as follows:
- authenticate()
- Performs authentication of the current user. This should handle the processing of login/logout requests and start/stop the session.
- isLoggedIn()
- Checks to see if the user is logged in.
- showLoginForm()
- Simply shows an HTML form for the user to log in. The input of this form is actually processed by the authenticate() function when the user submits the form.
These methods could be implemented as follows:
function authenticate(){
    session_start();	// start the session
    if ( isset( $_REQUEST['-action'] ) and $_REQUEST['-action'] == 'logout' ){
        // the user has invoked a logout request.
	session_destroy();
	header('Location: '.$_SERVER['PHP_SELF']);
	    // forward to the current page again now that we are logged out
	exit;
    }

    if ( isset( $_REQUEST['-action'] ) and $_REQUEST['-action'] == 'login' ){
	// The user is attempting to log in.
	if ( !isset( $_REQUEST['UserName'] ) || !isset($_REQUEST['Password']) ){
	    // The user did not submit a username of password for login.. trigger error.
	    trigger_error("Username or Password Not specified", E_USER_ERROR);
	    exit;
	}

	$res = mysql_query(
	    "SELECT UserID FROM Users
	     WHERE UserName='".addslashes($_REQUEST['UserName'])."'
	     AND Password='".addslashes($_REQUEST['Password'])."'");

	if ( mysql_num_rows($res) === 0 ){
	    trigger_error("Your username and password did not match any username/password pairs in the system.", E_USER_ERROR);
	    exit;
	}

	// If we are this far, then the login worked..  We will store the
	// userid in the session.
	list($_SESSION['UserID']) = mysql_fetch_row($res);

	// Now we forward to the homepage:
	header('Location: '.$_SERVER['PHP_SELF']);
	exit;
    }


}

function isLoggedIn(){
    return ( isset($_SESSION['UserID']) );
}

function showLoginForm(){
    echo '
	<html>
	    <head><title>Login Page</title></head>
	    <body>
		<form action="'.$_SERVER['PHP_SELF'].'" method="POST">
		    <input type="hidden" name="-action" value="login" />
		    <fieldset>
			<legend>Login</legend>
			<p>Welcome to the Faculty of Widgetry Website.
			   Please Enter your username and password.</p>
			<div class="field">
			    <label>UserName</label>
			    <input type="text" name="UserName" />
			</div>
			<div class="field">
			    <label>Password</label>
			    <input type="password" name="Password"/>
			</div>
			<input type="submit" name="-Submit" value="Submit">
		    </fieldset>
		</form>
	    </body>
	</html>';

}
Hopefully it isn’t too difficult to follow what is going on in these functions. Now, when you visit the Faculty of Widgetry application in your web browser you will see a login form as follows:
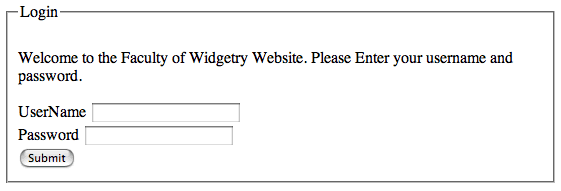
If you enter the username and password of a user that exists in your Users table, you will then be shown the application as before. If, however, you enter an incorrect username/password an error will be displayed. Note that with the code sample above the error won’t be very user friendly. It is up to you to decide how to display your errors, if you want to make the application “prettier”.
Adding a “Logout” link
Our application now makes it easy for users to log in. But what about logging out? Our implementation of the authenticate() function allows users to log out by setting “-action=logout” in the URL. E.g., if the user enters http://yourdomain.com/path/to/FacultyOfWidgetry/index.php?-action=logout, he will be logged out of the application. Users expect a link or button to logout, however, so let’s add one. For the purposes of this tutorial, we will simply add this link manually to the index.php file immediately after the call to $app->display() as follows:
...
if ( isLoggedIn() ){
    $app->display();
    echo '<a href="'.$_SERVER['PHP_SELF'].'?-action=logout">Log out</a>';
}
...
This is just a hack, and dataface provides a much better way to do this using templates. For for the purposes of this tutorial this “hack” is functional.
Adding getLoggedInUser() Function
Before delving into the permissions, we will find it useful to be able to access the currently logged in user’s database record from different places in our application. For this purpose, we define a function called getLoggedInUser() which returns a Dataface_Record object containing the currently logged in user as follows:
<?
/**
 * Returns Dataface_Record object of the currently logged in user - or null if
 * no user is currently logged in.
 */

function &getLoggedInUser(){
    static $user = 0;
    if ( $user === 0 ){
        if ( !isset($_SESSION['UserID']) ) $user = null;
        else {
            $query = array('UserID'=>$_SESSION['UserID']);
            $user = df_get_record('Users', $query);
        }
    }
    return $user;
}
?>
Either add this function to the top of your index.php file or add it to another file that is included by your index.php file. The important thing is that this method (or some method like it) is available to be called within your delegate classes when it comes time to define permissions. Notice that this function uses a static variable to store the user so that the user is only loaded from the database the first time this function is called.
Defining Permissions for the Course table
Finally, we are in a position to define permissions on the Course table. Using the Course table’s delegate class we can define permissions at a record level or a field level by defining the following classes of methods:
- getPermissions()
- Defines permissions for an entire record. This method takes a Dataface_Record object as input and outputs an array of permissions.