Using simple INI configuration files, you can customize the look and feel of your application. You can change widgets, labels, field descriptions, and more.
In the previous 2 sections we learned how to create a simple
application by desiging a database and then installing the basic
directory structure to make our application operational. Now it
is time to "decorate" the application a little bit. Decoration
occurs by way of simple configuration files that are placed in
strategic locations in the application. We can customize such
things as:
- Widget types (e.g., use a select list for a field rather than a text field)
- Labels (e.g., The ProgramName field's label can say "Program Name" instead of just "ProgramName")
- Field Descriptions . You can add descriptions to fields to help explain their meaning and how to use the application.
- HTML attributes. (e.g., Make a text field 50 characters wide)
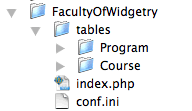
Table Configuration Directories
You will recall, that when we used the 'makesite' script to generate
the directory structure for our web application, it created a directory
named 'tables', with subdirectories named after each of the tables in
our database. The directory structure of the application looked
like:

The 'tables/Program' and 'tables/Course' are refered to as "table configuration directories" .
All of the configuration files a table in a Xataface application are
stored in its associated table configuration directory. For
example all configuration files for the 'Program' table are located in
the 'tables/Program' directory.
There are 4 main files that are generally contained in a table's configuration directory:
- fields.ini - Contains configuration for the fields of the table (e.g., field labels, descriptions, widget types, etc...)
- valuelists.ini - Contains value lists (vocabularies) that can be
used in the table to limit input into certain fields like select lists.
- relationships.ini - Defines the relationships between this table and other tables in the application.
- <TableName>.php (where <TableName> is the name of the
table. - A delegate PHP class that allows you to further customize the
behavior of the application with respect to this table. May contain
custom fields, importing/exporting functionality, permissions
information, and more...
Customizing Labels and Descriptions
We will start off by adding custom labels and descriptions to the
'Program' table of our 'FacultyOfWidgetry' application. This sort
of customization settings are placed in a file named 'fields.ini'
inside the table's configuration directory.
- Create the 'fields.ini' file in the Program table configuration directory (i.e., tables/Programs/fields.ini).
- Add the following to this file:
[ProgramName]
widget:label = "Program Name"
widget:description = "Enter the name of the program"
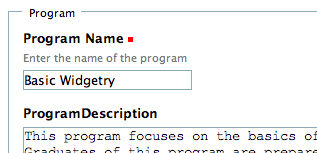
Now look at the "Edit Record" form in the Xataface application:

Notice how the label for the "ProgramName" now says "Program
Name" (note the space between "Program" and "Name"). And its
description matches the description specified in the fields.ini file.
The widget:label and widget:description attributes can be defined for any field in any table of the application.
Using different widgets
If no widgets are defined in the fields.ini file, a Xataface
application will make a best guess at the type of widget that should be
used to edit the value in a field. In general, the widgets used
by default are as follows:
- VARCHAR, CHAR, INT : html text field
- DATE, DATETIME fields: calendar widget
- TEXT fields : html text area
- BLOB fields : html file upload field
- INT Fields with "AUTO INCREMENT" : html hidden field
- VARCHAR or CHAR fields with "Password" or "password" as part of the name : html password field
- ENUM fields : html select list
- SET fields : html checkbox group (not yet supported as of this writing).
You can change the widget that is used to edit a field by specifying
a "widget:type" attribute for the field in the fields.ini file. For more information about the available widgets, see the widget:type manual page.
Example: Using HTML Editor to edit the HTMLOutline field
Clearly the HTMLOutline field in the Program table is intended to
store HTML content. By default our application only provides a
text area to do the editing so the user is expected to enter the HTML
markup by hand. It would be much better to provide the user with
a WYSIWYG (What you see is what you get) HTML editor widget. That
is exactly what we are going to do.
We will add a section to the fields.ini file so that it now looks like:
[ProgramName]
widget:label = "Program Name"
widget:description = "Enter the name of the program"

[HTMLOutline]
widget:type = "htmlarea"
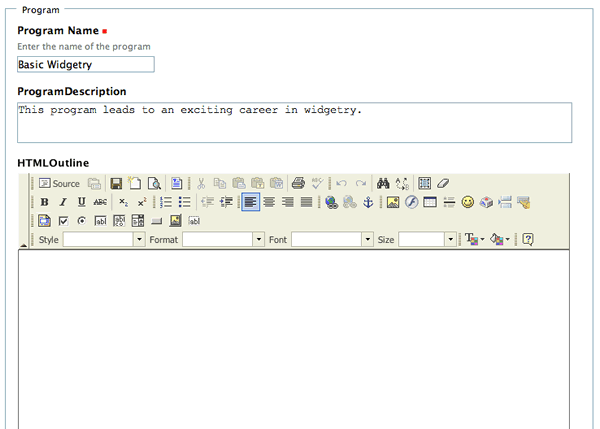
Now refresh the Xataface application in your web browser and look at the edit form for a record of the Program table:

As you can see, the HTMLOutline field now has an HTML Editor widget
for editing. Most users will find this much nicer to work with
than a normal text area. Xataface uses FCKEditor for its html editor widget.
There are a number of widgets that can be specified in the widget:type parameter:
- checkbox - An HTML checkbox (or checkbox group depending on context).
- date - Month/Day/Year select lists for selecting dates.
- calendar - A text field with a button that opens a small calendar widget when clicked.
- group - A complex widget type for editing multiple values as a group (useful for XML fields)
- hidden - a hidden field
- password - An HTML password widget
- select - An HTML select list (requires the 'vocabulary' attribute)
- static - an uneditable field
- table - A complex widget type for editing multiple values in a tabular format (Useful for XML fields)
- text - an html text field
- textarea - an html text area
Changing HTML attributes of widgets
Sometimes you may want even finer grained control of your widgets'
appearance than to just specify the type, label, and desription.
Perhaps you want to make a text field 50 characters wide, or to set the
CSS class of the html element. This can be done using the
'widget:atts:' parameter for a field. A short example is the
easiest way to explain how this works.
Modify the fields.ini for the Program table so it looks like:
[ProgramName]
widget:label = "Program Name"
widget:description = "Enter the name of the program"
widget:atts:size = 50
widget:atts:style = "font-size: 24pt; font-family: Apple Chancery"

[HTMLOutline]
widget:type = htmlarea
We have added 2 lines:
widget:atts:size = 50
widget:atts:style = "font-size: 24pt; font-family: Apple Chancery"
What this does is add the html attributes size="50" and
style="font-size: 24pt; font-family: Apple Chancery" to the html text
field that is used to edit the ProgramName field.
Look at the results:

The HTML tag for the text field now looks like:
<input class="default" id="ProgramName" name="ProgramName" type="text" size="50" style="font-size: 24pt; font-family: Apple Chancery" value="Basic Widgetry" />
In fact you can add arbitrary attributes to any of the fields using the same convention. Some useful examples are:
- widget:atts:rows for text areas to set the number of rows of text they should display.
- widget:atts:cols for text areas to set the number of columns (1 character = 1 column)
You can even use javascript calls in here if you like:
- widget:atts:onclick = "doJsFunction();"
Download source files
Download the source files for this application as a tar.gz archive
These source files reflect the state of the application at the current point of the tutorial. As changes are made to the application in later sections, downloads of those versions are made available for download also.
Summary
In this section we learned how to change the labels, descriptions,
and widgets for fields. We also learned how to add HTML
attributes to the widgets to achieve very fine-grained control over the
display of our forms.


