Build a simple Dataface application.
For our first Dataface application we will try to build a web site
for Faculty of Widgetry (From the example in the "Why Use Dataface"
page). The web site needs to store information about programs and
courses. An entity-relationship diagram (ERD) for this website is
included below:
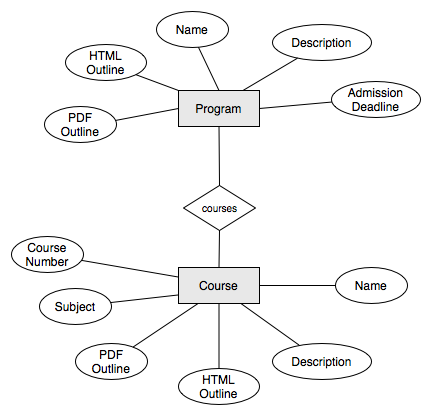
As the ERD shows, our database will need 2 tables (Course and
Program). Our next step is to build this database. You can
use any MySQL database administration tool to builld the
database. My personal tool of choice is PHPMyAdmin.
Step 1: Creating the database using PHPMyAdmin
The following steps describe the procedure for creating this database using PHPMyAdmin.
- At the main menu of PHPMyAdmin, type 'FacultyOfWidgetry' into the 'Create new database field' as follows:
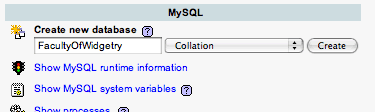
Then click 'Create'.
- First we will create the 'Course' table to hold course
information. In the 'FacultyOfWidgetry' page, fill in the 'Create
new table text field as follows:
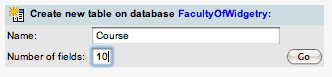
Then click 'Go'. - This should bring up a form to specify the fields for the course table:

Then click "Save". The resulting SQL to create the Course table is as follows:
CREATE TABLE `Course` (
`CourseID` int(11) NOT NULL auto_increment,
`ProgramID` int(11),
`CourseTitle` varchar(64) NOT NULL default '',
`CourseDescription` text NOT NULL,
`HTMLOutline` text NOT NULL,
`PDFOutline` longblob NOT NULL,
`PDFOutline_mimetype` varchar(64),
`Subject` varchar(128) NOT NULL default '',
`CourseNumber` varchar(10) NOT NULL default '',
`Credits` int(5) NOT NULL default '0',
`LastModified` timestamp NOT NULL default CURRENT_TIMESTAMP,
PRIMARY KEY (`CourseID`)
) ENGINE=MyISAM DEFAULT CHARSET=latin1 COMMENT='Store courses' AUTO_INCREMENT=1 ; - In a similar fashion, create the Program table. The resulting SQL for this table is:
CREATE TABLE `Program` (
`ProgramID` int(11) NOT NULL auto_increment,
`ProgramName` varchar(64) NOT NULL default '',
`ProgramDescription` text NOT NULL,
`HTMLOutline` text NOT NULL,
`PDFOutline` longblob NOT NULL,
`PDFOutline_mimetype` varchar(32),
`AdmissionDeadline` date NOT NULL default '0000-00-00',
`LastModified` timestamp NOT NULL default CURRENT_TIMESTAMP,
PRIMARY KEY (`ProgramID`)
) ENGINE=MyISAM DEFAULT CHARSET=latin1 COMMENT='Academic Program' AUTO_INCREMENT=1 ;
- The database has been created with 2 tables: Program and Course. We can now move on to building the Dataface application.
Step 2: Create Dataface Application
Our Dataface application will provide a user-friendly front-end to
our database. A basic application consists of a directory with a
configuration file and an entry page (PHP file). Dataface comes
with a PHP setup script (called makesite) to create the skeleton for
your application. Alternatively you can set up the application
manually.
Note: For the following instructions and examples, my Daface
installation is located at /Users/shannah/Sites/dataface and the URL
for the installation is http://localhost/~shannah/dataface.
Method 1: Setting up application with the 'makesite' script
- From the command prompt, navigate to the dataface directory. (in my case /Users/shannah/Sites/dataface).
- This directory contains a file named 'makesite'. It is a
PHP script that can be used to build a website powered by
dataface. To find out the usage options for this script you can simply call the script with no parameters. E.g.,
stevepbook:~/Sites/dataface shannah$ ./makesite
This will give you usage instructions for the script as follows:
makesite: invalid options entered.
Usage: makesite <site_path>
<db_user>:<db_pass>@<db_host>/<db_name>
<dataface_url>
or
php makesite <site_path>
<db_user>:<db_pass>@<db_host>/<db_name>
<dataface_url>
where
<site_path> = The path (absolute or relative) to your application
directory.
<db_user> = The MySQL
username to connect to the database
<db_pass> = The User's
password to connect to the database
<db_host> = The MySQL host
name.
<db_name> = The name of the
mysql database for the application.
<dataface_url> = The URL to the dataface installation
Examples:
makesite ../FacultyOfWidgetry root:password@localhost/FacultyOfWidgetry /dataface
The above command would create a site at ../FacultyOfWidgetry (i.e.,
the Faculty of
Widgetry directory in the parent directory. The database used for
this site is
located at localhost, and the database name is FacultyOfWidgetry.
The username
to connect to the database is root and his password is password.
- We create our FacultyOfWidgetry site using the following command:
./makesite ../FacultyOfWidgetry \
            root@localhost/FacultyOfWidgetry \
            http://localhost/~shannah/dataface
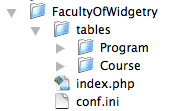
- This will create our application in the FacultyOfWidgetry folder
if everything worked ok. The contents of the folder will look
like:
You may be wondering what these files. Here is the short
version (Read the next section "Creating applications manually" for
more detailed information about the contents of these files.
The index.php file is the entry point for your application
(i.e., you point the web browser at this file to use the
application.
The conf.ini file contains database connection settings and some other
minor settings, like what should appear in the navigation menu.
The tables/Program (tables/Course) directory can contain configuration
files specific to the Program (Course) table. More on that later.
- Point your web browser to the FacultyOfWidgetry directory to see the application:
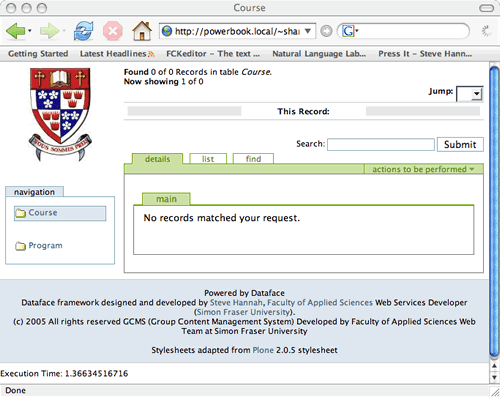
- Your application is now created. It will enable you to add,
edit, delete, and find records in either the Course table or the
Program table. There will be more on the basics of using this
application in the next section.
Method 2: Setting up application manually
Using the makesite script as described above is the recommended way
to set up an application because it saves time. However, it is
very easy to set up the application manually. Just follow these
steps:
- Create a directory for the application somewhere in your web site. We will call our directory 'FacultyOfWidgetry':
mkdir FacultyOfWidgetry
- Create a PHP file to serve as the access point for the
application. Generally we will name this file 'index.php', but
you can name it anything. Place the following contents in the
index.php file:
<?
require_once '/path/to/dataface/dataface-public-api.php';
df_init(__FILE__, 'http://yourdomain.com/dataface');
$app =& Dataface_Application::getInstance();
$app->display();
?>
OK, I guess some explanations are in order.
The first line imports the all of the public functions for dataface from the dataface-public-api.php file.
The second line initializes the application for the current directory and specifies the URL to the dataface installation.
The third line obtains an instance to the Application object - the core of your Dataface application.
The fourth line simply displays the application.
- Create a file named 'conf.ini' to contain database connection information. Its contents should be:
[_database]
host = "localhost"
user = "dbuser"
password = "secret"
name = "FacultyOfWidgetry"

[_tables]
Course = "Course"
Program = "Program"
Explanations:
There are 2 sections in this INI file: '_database', and '_tables'.
The '_database' section specifies the database connection information for the MySQL database.
The '_tables' section specifies which tables will be included in the navigation menu for the application.
- At this point, the application is functional. However there
is one more thing that should be done for security reasons. The
conf.ini file contains sensitive password information and should not be
served to the web. We will create an .htaccess file to tell
Apache NOT to serve this (or any) .ini file. The .htaccess file
should contain:
<FilesMatch "\.ini$">
Deny from all
</FilesMatch>
- The directory structure of your application will now look like:
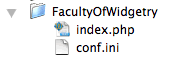
Note, however, that there is also an .htaccess file that is hidden from this image.
You may be wondering why there is no 'tables' directory like the
directory structure that was generated by the makesite script.
The 'tables' directory is not required for the application to be
functional. It will be required later on when we start to
decorate the database.
- The application is now ready to go. Point your web browser
to the index.php file that you created. It will look like: